■VMware Workstation 10にFortiSandbox-VMをインストール
VMイメージのダウンロードには
別途ライセンスがダウンロード可能な代理店契約か
正規アカウントが必要。
FSA-VMにはライセンスが含まれていないので、
ライセンス入力が無くても出来るところまで。
約4.8GBの空きメモリに収まるように無理やりFortiSandboxを起動するまで。
http://labunix.hateblo.jp/entry/20150825/1440429706
■今回のホストは1ソケットの2コアか、2ソケットの1コアしか選べない代わりに
16GBのメモリを搭載しているので、
FGT 1GB、FSA 8GB、FAZ 2GB、Win7 1GBでも計12GBなので、
問題なく同時起動出来る。
$ vmware --version
VMware Workstation 10.0.2 build-1744117
$ awk '/^processor/ || /^cpu core/ {print}' /proc/cpuinfo
processor : 0
cpu cores : 2
processor : 1
cpu cores : 2
$ cat /proc/meminfo | awk '/^MemTotal/{print}'
MemTotal: 16340724 kB
■ovfをimportすれば良いので、zipのmd5sumだけ確認。
$ md5sum vmware/SharedVMs/*/*.zip
09432b24d60f47a5b097b9e823c1c07a vmware/SharedVMs/FAZ/FAZ_VM64-v500-build0662-FORTINET.out.ovf.zip
47c3257c67da414ed7dcd258b0e1a1bd vmware/SharedVMs/FGT/FGT_VM64-v5-build0688-FORTINET.out.ovf.zip
8adfb6bdc689aaa07af7649b68fb39b1 vmware/SharedVMs/FSA/FSA_VM-v200-build0081-FORTINET.out.ovf.zip
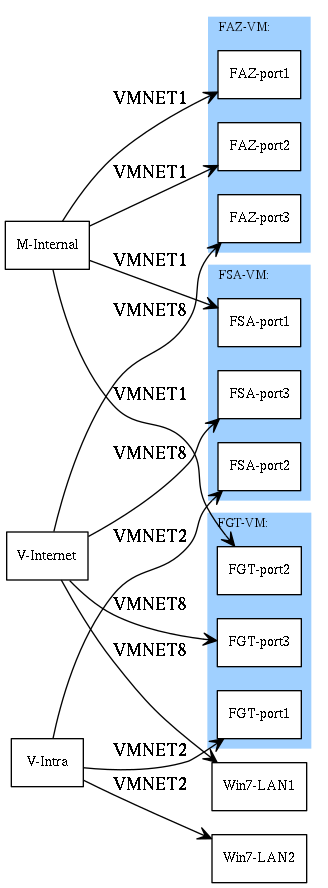
■配線図を作成する。
FortiSandboxのポートはそれぞれ以下に固定されている。
Sandboxの制限に合わせて、配線図を作成。
port1は管理用
port3はExternal用
port2,port4-6はSniffer,Device,Ondemand用
$ cat fsa.txt
[V-Internet] -- VMNET8 --> [FGT-port3],[FSA-port3],[FAZ-port3],[Win7-LAN1]
[M-Internal] -- VMNET1 --> [FGT-port2],[FSA-port1],[FAZ-port1],[FAZ-port2]
[V-Intra] -- VMNET2 --> [FGT-port1],[FSA-port2],[Win7-LAN2]
(FGT-VM: [FGT-port1],[FGT-port2],[FGT-port3])
(FAZ-VM: [FAZ-port1],[FAZ-port2],[FAZ-port3])
(FSA-VM: [FSA-port1],[FSA-port2],[FSA-port3])
$ graph-easy --dot < fsa.txt > fsa.dot
$ dot -Tpng fsa.dot -o fsa.png

■大抵の場合、プロミスキャスモードが要件となる。
内部NICは除外する。
$ sudo ls -l /dev/vmnet*
crw-rw---- 1 root promiscuous 119, 0 10月 19 00:12 /dev/vmnet0
crw-rw---- 1 root promiscuous 119, 1 10月 19 00:12 /dev/vmnet1
crw-rw---- 1 root promiscuous 119, 2 10月 19 00:12 /dev/vmnet2
crw-rw---- 1 root promiscuous 119, 8 10月 19 00:12 /dev/vmnet8
■ネットワーク設定の確認
$ ip a list | awk '/inet .*vmnet/{print}'
inet 172.16.247.1/24 brd 172.16.247.255 scope global vmnet1
inet 192.168.11.1/24 brd 192.168.11.255 scope global vmnet2
inet 172.16.115.1/24 brd 172.16.115.255 scope global vmnet8
■Fortigate-VMの設定
config system interface
edit "port1"
set ip 192.168.11.4 255.255.255.0
next
edit "port2"
set ip 172.16.247.4 255.255.255.0
set allowaccess ping https ssh http telnet fgfm
next
edit "port3"
set ip 172.16.115.4 255.255.255.0
next
end
config router static
edit 0
set dst 172.16.115.0 255.255.255.0
set gateway 172.16.115.2
set device port3
next
end
■FortiAnalyzer-VMの設定
config system interface
edit "port1"
set ip 172.16.247.7 255.255.255.0
set allowaccess ping https ssh telnet http webservice aggregator fgfm
set allowaccess ping https ssh http telnet fgfm
next
edit "port2"
set ip 192.168.11.3 255.255.255.0
next
edit "port3"
set ip 172.16.115.3 255.255.255.0
next
end
config system route
edit 0
set gateway 172.16.115.2
set device port3
next
end
■FortiSandbox-VMの設定
> set port1-ip 172.16.247.5/255.255.255.0
> set port2-ip 192.168.11.5/255.255.255.0
> set port3-ip 172.16.115.5/255.255.255.0
> set default-gw 172.16.115.2
■Windows7の設定
ブラウザの要件がIE11またはFirefoxなので、
Firefoxをインストール出来るようにプロキシ経由で外部に接続出来るようにする。
その後はLAN2を無効にして隔離
LAN1 172.16.247.6/255.255.255.0
LAN2 172.16.115.6/255.255.255.0
gateway 172.16.115.2
DNS1 172.16.115.2
■言語とタイムゾーンの設定
config system global
set language japanese
set timezone 60
end
システム->ダッシュボード->ステータス
システム情報->システム時間->[変更]
システム->管理者->設定->言語
■ホストもプロキシを通さないと外部に出れない環境なので、それぞれ設定する。
config system autoupdate tunneling
set address "172.16.16.254"
set password
set port 3128
set status enable
set username
end
config fmupdate av-ips web-proxy
set ip "172.16.16.254"
set mode proxy
set password
set port 3128
set status enable
set username
end
システム->ネットワーク->プロキシ
■ログサーバ連携
config log fortianalyzer setting
set status enable
set server 172.16.247.3
set upload-option realtime
end
ログ&レポート->ログ->ログサーバ->[新規作成]
■サンドボックス連携
config system fortisandbox
set status enable
set server 172.16.247.5
end
■Windows-VMをSCP経由でダウンロード
FortiSandboxから実行。スペースが入ってはいけないとか、
ポートを変更できないとか、若干面倒な作り。
後は単純に容量が大きいので、時間がかかる。
$ du -h 2015022118_vm.pkg.7z
7.4G 2015022118_vm.pkg.7z
$ md5sum 2015022118_vm.pkg.7z
bb34d872690bcccdc14de5010f0f5be4 2015022118_vm.pkg.7z
> fw-upgrade -v -s172.16.16.254 -uadmin -pPassWord -f2015022118_vm.pkg.7z
You are about the download a new set of VM image.
After reboot, the system will re-activate Microsoft Windows OS within it.
Note: One OS license can only be used for activation for a limited number of times.
Do you want to continue? (y/n)y
2015022118_vm.pkg.7z 100% 7557MB 18.5MB/s 06:49
Start installing VM image file 2015022118_vm.pkg.7z
Reboot system!
■Windows-VMは再起動後もライセンスが無いので起動しない。
> vm-status
Invalid FSA-VM license.
> vm-license -l
ERROR: EEPROM programming failed.
Windows Product Keys Validation .......... Failed
> sandbox-engines
Sandbox components versions:
Tracer Engine: 5.0.556
Rating Engine: 2.1.062
Traffic Sniffer: 3.0.062
Botnet Signature DB: 1.829
IPS Signature DB: 5.556
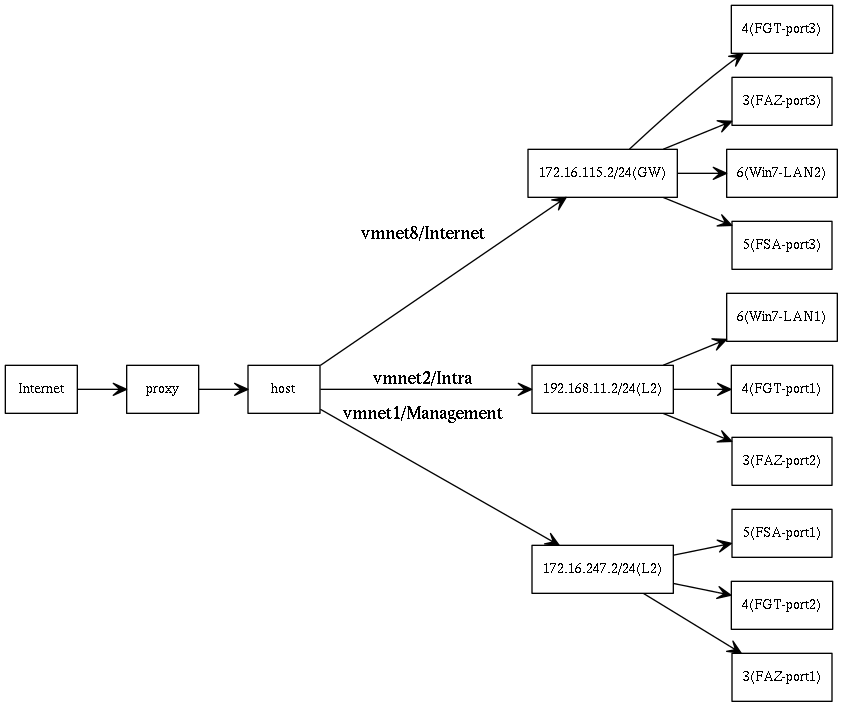
■FAZ(3)、FGT(4)、FSA(5)、Win(6)で設定した
IPのネットワーク図を作成
$ cat fsaip.txt
[Internet] --> [proxy] --> [host]
[host] -- vmnet8/Internet --> [172.16.115.2/24(GW)]
[172.16.115.2/24(GW)] --> [3(FAZ-port3)],[4(FGT-port3)],[5(FSA-port3)],[6(Win7-LAN2)]
[host] -- vmnet1/Management --> [172.16.247.2/24(L2)]
[172.16.247.2/24(L2)] --> [3(FAZ-port1)],[4(FGT-port2)],[5(FSA-port1)]
[host] -- vmnet2/Intra --> [192.168.11.2/24(L2)]
[192.168.11.2/24(L2)] --> [3(FAZ-port2)],[4(FGT-port1)], [6(Win7-LAN1)]
$ graph-easy --dot < fsaip.txt > fsaip.dot
$ dot -Tpng fsaip.dot > fsaip.png


